


Attify Badge - UART, JTAG, SPI, I2C
Sku: TT-FLK-5950
₹10,500
Features
- Out of Stock. Call us before placing an order.
Description of product
Description
Attify badge is a hardware tool that allows you to interact with various hardware interfaces and ports such as UART, SPI, I2C, JTAG, GPIO and so on.
Exploit IoT devices using the Attify Badge as your swiss army knife for hacking hardware devices. This tool was initially developed for the "Offensive IoT Exploitation" training conducted by Attify conducted both real-world and online.
Get this tool and get started on your IoT and Hardware exploitation journey.
Identifying UART pins
Attify badge can be used in order to perform UART sniffing and getting root access over UART, depending on the device.
In case you are not familiar with how to identify UART pinouts, below is a quick step-by-step way on identifying Tx, Rx, Vcc and GND for UART :
Follow the steps below to exploit a device over UART
(Note : Below is a common way to identify the pinouts. Depending on the device, the steps might vary due to things like protection, scattered UART pins etc.)
- Look for a 4 or 3 pins or pads which are in a block together.
- In order to perform UART based exploitation, we need to correctly identify four pins namely – Tx, Rx, GND and Vcc.
- To identify the individual pins, a multi-meter is required. Start off by connecting the black probe and the red probe of the multimeter to the device GND and the ground pin of Attify badge respectively. Reiterate till you hear a beep sound.
- VCC can be ignored for our case, since it is not needed for a UART based exploitation.
- By using a multimeter as ohmmeter, an infinite resistance between the TX and VCC pin will be noticed. This can also be determined by a huge variation or fluctuation in the voltage as soon as we power on the device.
- Rx can be determined by the pin having the lowest voltage during the entire process, with having the black probe connected to the GND of the Attify badge.
SPI Dumping
Since our Attify badge can speak a number of different protocols, you could also use it to dump contents from an SPI flash as shown below. Simply make the necessary connections as mentioned in the pinout above, identify the name of the chip and you’re all set.

]
SPI memory dumping on IoT device
JTAG exploitation
We won’t go much in-depth into the basics of JTAG over here, maybe we will do that in another blog post. Stay tuned for future blog updates.
One of the first steps in JTAG exploitation is identifying the pinouts for JTAG. This could be done in different ways – either you could use JTAGulator (the recommended and reliable method), or use something like Arduino loaded up with JTAGenum.
Once you have identified the JTAG pinouts, you can then go ahead and start debugging using OpenOCD and JTAG (something which we will cover in upcoming posts) – some screenshots below.

]
Custom challenge password authentication to be hacked
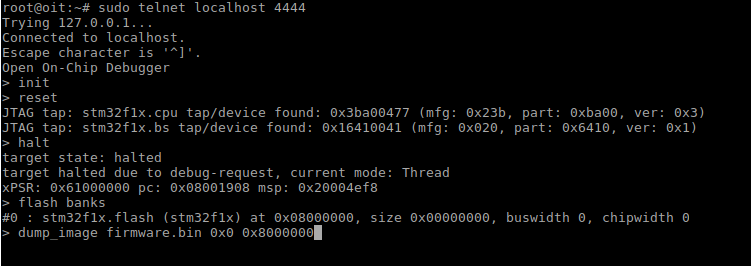
Dump images using JTAG for IoT devices
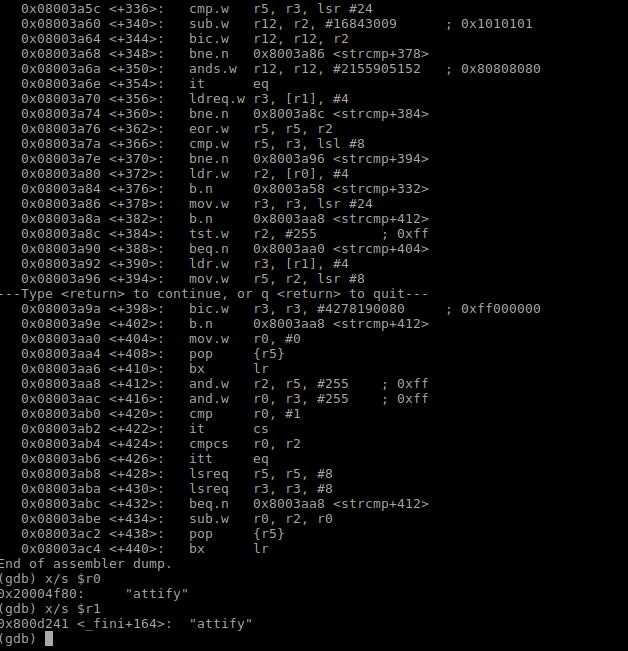
Exploiting password verification using GDB over JTAG via OpenOCD
So this is how you could use Attify Badge in order to exploit IoT devices. We will be writing further blog posts on more detailed step-by-step guides of exploiting various interfaces and protocols.
Related products


, The Pico + Color LCD + IMU Sensor + GPIO Expander")


